Tom White

DIY Controller (for under £15) Instructions...
« on: January 22, 2015, 06:33:26 pm »
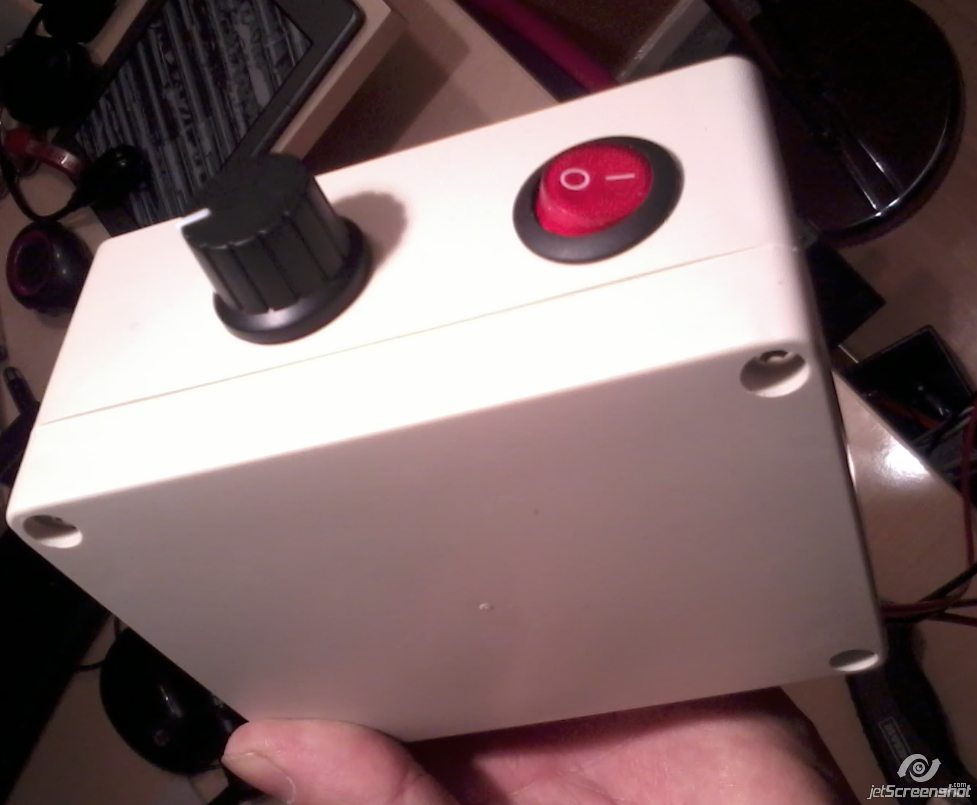
I've just made another DIY controller - a spare - for under £15.  These are class, they only require calibration once (the air temperature doesn't affect them), and they don't require a battery in good nick to work either; they'll run on any old 12v battery.  

I've included an on/off LED switch - though I think that's superfluous to requirments; it would work without it and be even simpler to produce.  An LED on/off switch lets me know if it's on at a glance, and it also means I don't have to turn the dial to turn it on (I'm very lazy).


Anyway, these are the parts I purchased:

12v LED rocker switch £2.00
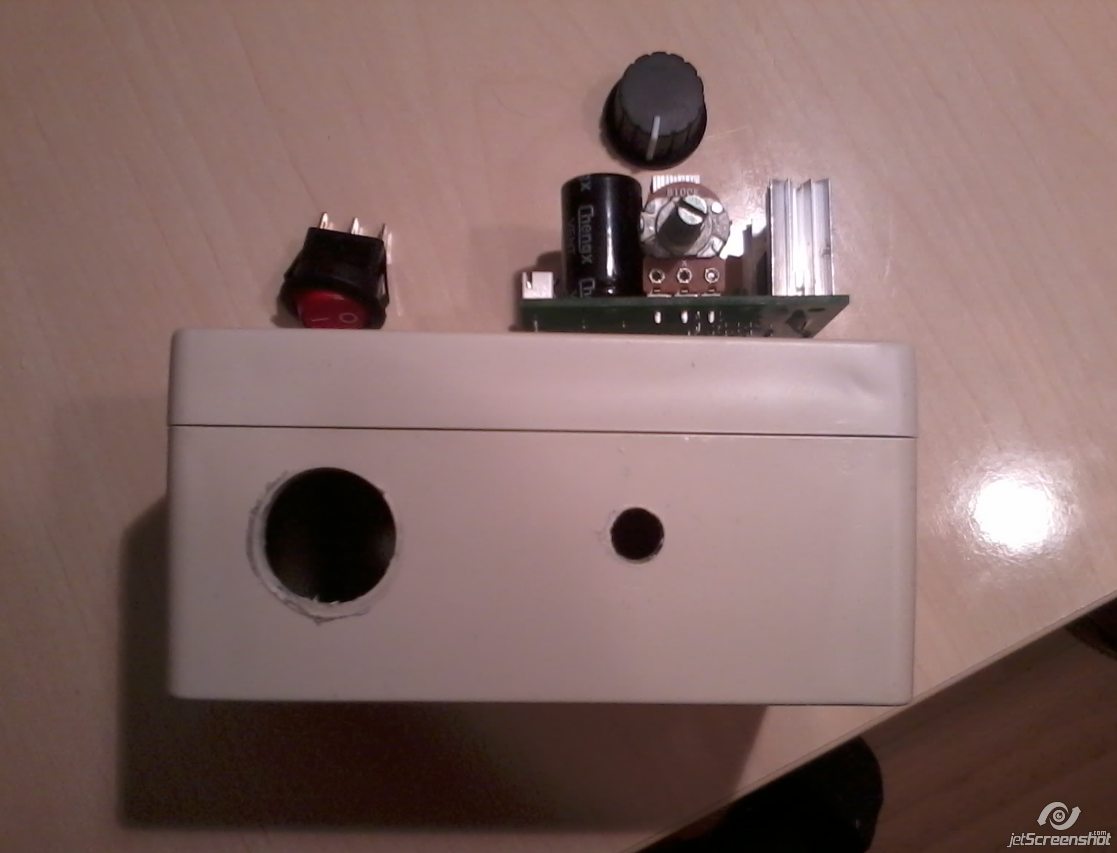
http://www.ebay.co.uk/itm/261513977084?_trksid=p2060778.m2749.l2649&var=560391577650&ssPageName=STRK%3AMEBIDX%3AIT

Waterproof Project Box 115*90*55mm £4.52
http://www.ebay.co.uk/itm/201212241692?_trksid=p2060778.m2749.l2649&var=500405437151&ssPageName=STRK%3AMEBIDX%3AIT

10A 12V~40V PWM DC Motor Speed Control Switch Controller Volt Regulator £7.00
http://www.ebay.co.uk/itm/10A-12V-40V-PWM-DC-Motor-Speed-Control-Switch-Controller-Volt-Regulator-Dimmer-/121250426718?pt=UK_BOI_Industrial_Automation_Control_ET&hash=item1c3b16af5e

I drilled the holes for the voltage regulator and the switch and a hole at the rear for the wires that go to the pump and the battery:


Then I wired it up; soldering the wires on the switch (first time soldering; which why it looks rough):


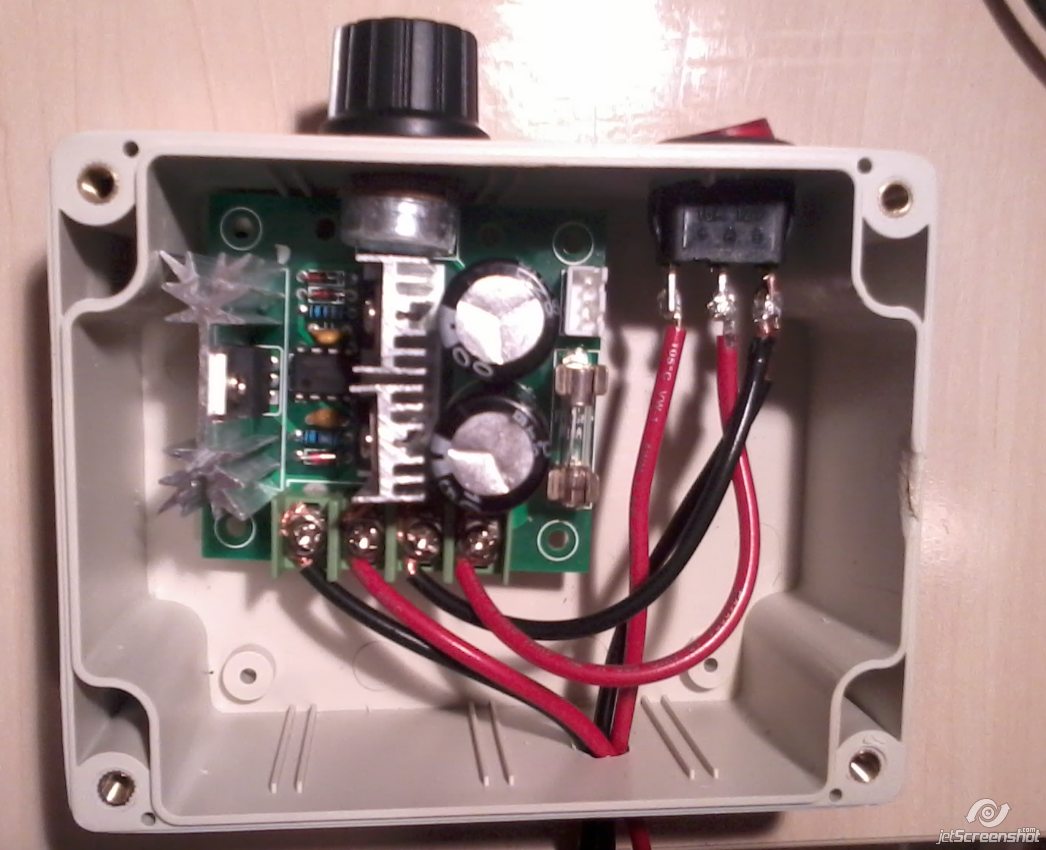
I was unsure how to solder or wire a rocker switch, but it's all on youtube:

How to wire a rocker switch:
https://www.youtube.com/watch?v=cQpQWFYX524

How to solder:
https://www.youtube.com/watch?v=BLfXXRfRIzY

The wiring on the voltage regulator is easy; on the rear it tells you what's what, with regards motor +- and battery +-.

I quite enjoyed doing it too.

If anyone fancies a bash, don't be shy to ask questions, though it's pretty straightforward.

And if anyone can suggest any improvements, I'm all ears.

Oh, Ionics sell a similar, with VAT and delivery, it's £210.00


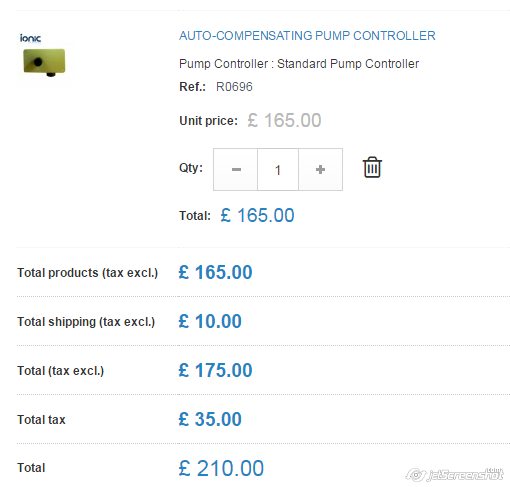
And it doesn't even have an LED switch on it!  :'( :'(


Don Kee

  • Posts: 4854
Re: DIY Controller Instructions...
« Reply #1 on: January 22, 2015, 06:42:40 pm »
Looks good mate, good post


When you say only needs calibrating once, how do you calibrate it?
I'm assuming it runs off the pumps pressure switch, so wouldn't need 'calibrating', just a pressure change on the p/s itself?

Clever Forum Name

  • Posts: 5942
Re: DIY Controller Instructions...
« Reply #2 on: January 22, 2015, 06:45:39 pm »
WOW - A helpful post lol

Impressed Tosh. The only niggle for me is the soldered wires. I would have used a little bit of heat shrink. Doubtful they will ever touch BUT they said the titanic wouldn't sink and seanK wouldn't post 4000 replies on vision.

Tom White

Re: DIY Controller Instructions...
« Reply #3 on: January 22, 2015, 06:47:48 pm »
Looks good mate, good post


When you say only needs calibrating once, how do you calibrate it?
I'm assuming it runs off the pumps pressure switch, so wouldn't need 'calibrating', just a pressure change on the p/s itself?

Thanks; yes, you're right - thanks for clarifying my post.  Just the pump's pressure switch would need calibrating.

For those who don't know, just connect hose reel to pump, and pole to hose reel and turn it on.

At the bottom of your pump (on a Shurflo anyway) there's a hexagonal 'nut' where the arrow is pointing:


Just adjust that so the water flows nicely - your normal working flow - yet when you 'dead end' the flow (whichever method you use to stop the flow), the pump shuts down pretty much straight away.

I've only ever had to do this once, unlike my old electronic flow controllers, which made me do it if the temperature changed.

Tom White

Re: DIY Controller Instructions...
« Reply #4 on: January 22, 2015, 06:48:43 pm »
I would have used a little bit of heat shrink.

I never knew that existed for wires like this.  Would that hold them as secure as solder?

Clever Forum Name

  • Posts: 5942
Re: DIY Controller Instructions...
« Reply #5 on: January 22, 2015, 06:50:07 pm »
I would have used a little bit of heat shrink.

I never knew that existed for wires like this.  Would that hold them as secure as solder?

No bud acts as an insulator :) Same as tape. Just more professional :)

Tom White

Re: DIY Controller Instructions...
« Reply #6 on: January 22, 2015, 06:52:44 pm »
I would have used a little bit of heat shrink.

I never knew that existed for wires like this.  Would that hold them as secure as solder?

No bud acts as an insulator :) Same as tape. Just more professional :)

I'm a 'bodge it' kinda guy.  I'll wrap some tape around it.  ;D

Thanks.

Clever Forum Name

  • Posts: 5942
Re: DIY Controller Instructions...
« Reply #7 on: January 22, 2015, 06:53:26 pm »
I would have used a little bit of heat shrink.

I never knew that existed for wires like this.  Would that hold them as secure as solder?

No bud acts as an insulator :) Same as tape. Just more professional :)

I'm a 'bodge it' kinda guy.  I'll wrap some tape around it.  ;D

Thanks.

Yeah tape will do, don't want a van fire ;)

Dave Willis

Re: DIY Controller (for under £15) Instructions...
« Reply #8 on: January 22, 2015, 06:55:08 pm »
Careful Tosh, I can see a ban coming on!
Last bloke that criticised Ionics never came back!

DeLuce

  • Posts: 1153
Re: DIY Controller (for under £15) Instructions...
« Reply #9 on: January 22, 2015, 07:00:17 pm »
Thanks for the info Tosh, great idea. I feel I  could give that a go.
I read the other post you had going which discussed the circuit board and what to do. Cheers for that.

SeanK

Re: DIY Controller (for under £15) Instructions...
« Reply #10 on: January 22, 2015, 07:19:04 pm »
Cheers Tosh,I'm building a trolley for back up and that will sort my controller out.

rosskesava

  • Posts: 17015
Re: DIY Controller Instructions...
« Reply #11 on: January 22, 2015, 07:24:07 pm »
WOW - A helpful post lol

Impressed Tosh. The only niggle for me is the soldered wires. I would have used a little bit of heat shrink. Doubtful they will ever touch BUT they said the titanic wouldn't sink and seanK wouldn't post 4000 replies on vision.

I used candle wax. Just light the candle and drip wax onto the bare wire and connectors.

I also waterproofed my trolley pump the same way.
Just chant..... Hare Krsna, Hare Krsna, Krsna Krsna, Hare Hare, Hare Rama, Hare Rama, Rama Rama, Hare Hare. It's beats chanting Tory Tory or Labour Labour.

ray mck

  • Posts: 373
Re: DIY Controller (for under £15) Instructions...
« Reply #12 on: January 22, 2015, 07:45:18 pm »
I like that😄 cheers

Steve foster

  • Posts: 90
Re: DIY Controller (for under £15) Instructions...
« Reply #13 on: January 22, 2015, 08:02:20 pm »
Many thanks. Page added to favorites for future use. Must go and buy some candles now. ;D

CleanClear

  • Posts: 14238
Re: DIY Controller (for under £15) Instructions...
« Reply #14 on: January 22, 2015, 08:18:06 pm »
Great info thanks Tosh. The only downside to this setup could be someone running their battery right down and potentially shortening its life. If you charge them daily they should be fine. For an extra pound or two i think it would be enhanced by putting one of these on the box...........
http://www.amazon.co.uk/dp/B008KY5ULW

That way you could make an informed choice not to run your battery below say...11 volts ?
*Status*--------Currently Online---------

Tom White

Re: DIY Controller (for under £15) Instructions...
« Reply #15 on: January 22, 2015, 09:34:48 pm »
Great info thanks Tosh. The only downside to this setup could be someone running their battery right down and potentially shortening its life. If you charge them daily they should be fine. For an extra pound or two i think it would be enhanced by putting one of these on the box...........
http://www.amazon.co.uk/dp/B008KY5ULW

That way you could make an informed choice not to run your battery below say...11 volts ?

Cheers, Clean, I've just ordered one and I'll add it to the controller I've just made.  The only downside to it is that it's square shaped - it means cutting the box rather than being able to drill through it.

But cutting through it won't be that difficult.

Thanks, top tip.

Clever Forum Name

  • Posts: 5942
Re: DIY Controller Instructions...
« Reply #16 on: January 22, 2015, 10:05:11 pm »
WOW - A helpful post lol

Impressed Tosh. The only niggle for me is the soldered wires. I would have used a little bit of heat shrink. Doubtful they will ever touch BUT they said the titanic wouldn't sink and seanK wouldn't post 4000 replies on vision.

I used candle wax. Just light the candle and drip wax onto the bare wire and connectors.

I also waterproofed my trolley pump the same way.

Never knew that!!

mark15

  • Posts: 63
Re: DIY Controller (for under £15) Instructions...
« Reply #17 on: January 22, 2015, 11:18:09 pm »
Excellent post.... Well done 👍👍👍

robert mitchell

  • Posts: 1988
Re: DIY Controller (for under £15) Instructions...
« Reply #18 on: January 22, 2015, 11:23:38 pm »
Great info thanks Tosh. The only downside to this setup could be someone running their battery right down and potentially shortening its life. If you charge them daily they should be fine. For an extra pound or two i think it would be enhanced by putting one of these on the box...........
http://www.amazon.co.uk/dp/B008KY5ULW

That way you could make an informed choice not to run your battery below say...11 volts ?

This one might be easier to fit to the box .

http://www.amazon.co.uk/Voltmeter-Chargers-WaterProof-Motorcycle-Motorbike/dp/B00JY0V3TY/ref=sr_1_8?s=diy&ie=UTF8&qid=1421968864&sr=1-8&keywords=12v+digital+voltmeter#productDetails
www.ishinewindowcleaning.co.uk

The man who never made a mistake never made anything.

Tom White

Re: DIY Controller (for under £15) Instructions...
« Reply #19 on: January 22, 2015, 11:31:40 pm »
Great info thanks Tosh. The only downside to this setup could be someone running their battery right down and potentially shortening its life. If you charge them daily they should be fine. For an extra pound or two i think it would be enhanced by putting one of these on the box...........
http://www.amazon.co.uk/dp/B008KY5ULW

That way you could make an informed choice not to run your battery below say...11 volts ?

This one might be easier to fit to the box .

http://www.amazon.co.uk/Voltmeter-Chargers-WaterProof-Motorcycle-Motorbike/dp/B00JY0V3TY/ref=sr_1_8?s=diy&ie=UTF8&qid=1421968864&sr=1-8&keywords=12v+digital+voltmeter#productDetails

Spot on.

Same thing here at half the cost (postage free):

http://www.ebay.co.uk/itm/Latest-12V-24V-Car-Motorcycle-LED-Digital-Display-Voltmeter-Waterproof-Meter-/391013209795?pt=UK_BOI_Electrical_Test_Measurement_Equipment_ET&var=&hash=item5b0a3416c3

 ;D